Google Cloud Machine Learning
UPDATE TO THIS POST:
Dec 12, 2017:
The cloud based approach described in this blog post has resulted in 59% accuracy for the Tensorflow Voice Data Challenge, which is somewhere in the middle of the pack for teams working on the problem! The increased training has resulted in an improvement of about 3% from my best submission to date. Training following this approach took 20 hours and 10 minutes on Google Cloud Machine Learning.
Introduction

I have been spending a bit of time lately working on a Kaggle.com challenge related to voice recognition. More information about the challenge can be found on the Kaggle site. My approach can be found in this blog post. As part of that work, I have been training my neural network models on my local Mac. Initially, this was not an issue. However, as the models that I have been working with have become increasingly deep and complex, the amount of time it is taking to train the models is starting to become a drag. When running the model training routines, my Mac CPU is maxed out and the fan runs non-stop. That cannot be good for the hardware, I’m sure.
I decided that it makes sense to attempt to train the models on the google cloud, rather than just train them locally. This blog post will go over the steps that I took to get my Keras/TensorFlow CNN modes for the Kaggle challenge to run in the Google Cloud Machine Learning environment.
Here is a brief overview of what I have done:
- Configure Google Cloud SDK client on my machine.
- Run through the “census” Google Cloud Machine Learning tutorial.
- Initiate a project
- What… Python 2.7 only?!
- Redo my project for Python 2.7
- Use the python distribution of 2.7.14 and install it on the Mac
- Use virtualenv to create a virtual environment for python 2.7
- Install all the required libraries ($> pip install __) …
- numpy
- keras
- tensorflow (I also updated my local version of tensorflow as well.)
- Pillow
- h5py
- using pip install __
- Verify that the thing works locally.
- Verify that I can get the thing to work with the “gcloud” utility locally.
- Finally get the thing to work on the cloud.
It has been a while since I last did a blog post, and the above steps probably provide some idea why. Getting up and running on Google Cloud Machine Learning has taken a considerable amount of work. In the end, I think it has been worth it… However, I would suggest that you make sure and read the conclusion about how well the Google Cloud performs compared to my local box.
Going through the Gogle ML training demo.
As I mentioned above, I decided a good first step would be to go through the Google ML tutorial. The tutorial requires that the google cloud SDK is installed. Once that is done, you can find the tutorial here
I won’t recount all the steps I took as they are similar to what is listed in the tutorial. There are a few notes that I would like to share, however:
Notes:
Because I am using zshell, wildcards with paths sometimes do not work as expected. So it was necessary to change commands to include single quotes, eg:
gsutil -m cp 'gs://cloudml-public/census/data/*' data/
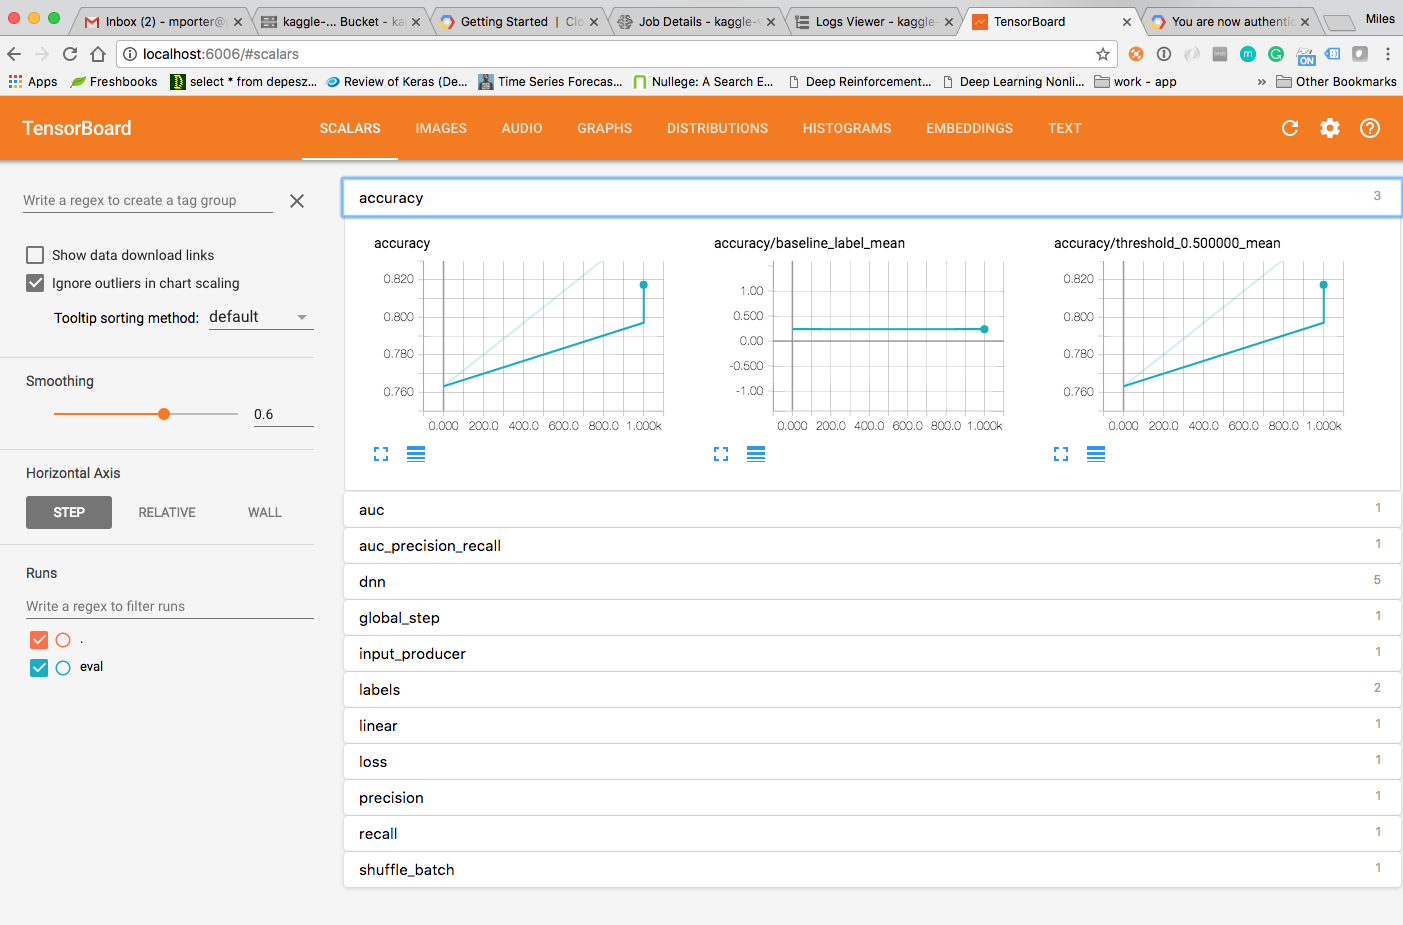
I had some trouble getting tensorboard to work when running the model on the server. The error I was getting was:
2017-12-06 14:23:43.164730: I tensorflow/core/platform/cloud/retrying_utils.cc:77] The operation failed and will be automatically retried in 1.35008 seconds (attempt 1 out of 10), caused by: Unavailable: Error executing an HTTP request (HTTP response code 0, error code 6, error message 'Couldn't resolve host 'metadata'')
Which, to some engineer at google, is a way of saying that my authentication wasn’t correct. (Or is the result of said condition.) To get around it, I entered the following command based on a StackOverflow questions:
gcloud auth application-default login
That enabled tensorboard to start working.

Part 2. Can I get my model to train up there.
First I need to put my training files up there
I first needed to copy all of the pre-processed image files to google storage so that they can be loaded from my training script. To do that, I used only the 10 image directories needed for the Kaggle voice challenge problem. The Google console makes this pretty easy. I logged into the google console, and then created a bucket. Next, I just uploaded the files I wanted.
But wait… The google console provides a mechanism for uploading the files, but because the number of files that I wanted to upload was so large, the browser really had a tough time. I finally canceled the upload via the browser and used the command line utility. I had already converted these files from audio format to MFCC image files. The original files are from the Kaggle Tensorflow Voice Challenge. For more info on how I got the images, please see this post.
Here is the “gustil” command that I used to copy my pre-processed images.
gsutil -m cp -r kaggle_10/ gs://kaggle_voice_data
I did have some concern about how much this is going to cost. Google Cloud has a free trial (essentially with a 300 dollar credit).
After working with Google Cloud for a day, it seemed that I would probably be OK.

Once I got the training image files uploaded to Google Storage, I turned my attention to trying to run my own machine learning model in the cloud.
Training Models in the Cloud
Again, represents my work on the Kaggle Tensorflow Voice Challenge. This challenge involves identifying spoken words in audio files. My code for this project is in github.com
One of the things to note about this code is that Google only supports python 2.7. Google has historically been behind in their support of python versions. Anyway, it was not to difficult to set up a virtualenv for python 2.7 and modify my code so that it will work in that older version of python.
After looking at the code that Google provided as an example of their machine learning stuff, I attempted to run my code locally in the same way that is mentioned in their tutorial.
This uncovered an unfortunate issue. My code was using the Keras provided “flow_from_directory” function as a way to load the data from the local file system. I wanted a way to load the data from google cloud storage. To facilitate that, I modified the way that my trainer worked and added a mechanism to load the training data from google cloud storage.
As a result my training routine changes from
...
m = trainer.models.Models()
#model = m.get_cifar_model(input_shape, 10)
#model = m.get_cifar_model_2(input_shape, 10)
model = m.get_av_blog_model_4(input_shape, 30)

train_datagen = ImageDataGenerator(rescale=1. / 255,  height_shift_range=0.2)
#train_datagen = ImageDataGenerator(rescale=1.0/255)

# this is the augmentation configuration we will use for testing:
# only rescaling
test_datagen = ImageDataGenerator(rescale=1. / 255)
#test_datagen = ImageDataGenerator()
train_generator = train_datagen.flow_from_directory(
    train_data_dir,
    target_size=(img_width, img_height),
    batch_size=batch_size,
    color_mode="grayscale",
    class_mode='categorical')

validation_generator = test_datagen.flow_from_directory(
    validation_data_dir,
    target_size=(img_width, img_height),
    batch_size=batch_size,
    color_mode="grayscale",
    class_mode='categorical')

history = model.fit_generator(
    train_generator,
    steps_per_epoch=nb_train_samples // batch_size,
    epochs=epochs,
    validation_data=validation_generator,
    validation_steps=nb_validation_samples // batch_size)
...
to…
...
m = models.Models()
#model = m.get_cifar_model(input_shape, 10)
#model = m.get_cifar_model_2(input_shape, 10)
model = m.get_av_blog_model_4(input_shape, 10)
du = DataUtility(bucket_id='kaggle_voice_data', root_folder='/')

#X, Y = du.load_data_local('/Users/milesporter/Desktop/Kaggle Voice Challenge/data/npz')
X, Y = du.load_cloud_data()

x_train, y_train, x_test, y_test = train_test_split(X, Y, test_size=0.33, random_state=42)

# x_train -> Training data to feed the net
# x_test ->  Training data for evaluation
# y_train -> VALIDATION data for net input
# y_test -> Expected Validation output
#
# Train the network with x_train and x_test
# Evaluate the network with y_train and y_test
# So x_test and y_test should be categorical

x_test = np_utils.to_categorical(x_test, 10)  # Shouldn't hard code this.
y_test = np_utils.to_categorical(y_test, 10)    # Shouldn't hard code this.

x_train = np.expand_dims(x_train, axis=3)
y_train = np.expand_dims(y_train, axis=3)

datagen = ImageDataGenerator(
    featurewise_center=True,
    featurewise_std_normalization=True,
    rotation_range=0,
    height_shift_range=0.2,
    horizontal_flip=False
)

model.fit_generator(datagen.flow(x_train, x_test, batch_size=32),
                    steps_per_epoch=len(x_train) / 32, epochs=epochs)

...
Getting the Trainer to Run Locally
Before running the code on Google Cloud, I first followed the approach used in the tutorial. In that exercise, the code is first run locally to confirm that everything works before it is submitted to the cloud for training there. After some trial and error, I was able to first get the code to run from the command line as a simple python program, and eventually by using the gcloud command for running the training locally. Here is what my command looked like:
gcloud ml-engine local train --package-path trainer --module-name trainer.google_model_trainer --job-dir=$MODEL
Where the environment variable MODEL is set to the url of the google storage bucket that I am using.
Once I got this to work, I tried to run my trainer on the cloud by removing the “local” from the above statement. It was a long shot… and it didn’t work. There were several things that needed to be done first.
- The dependencies for my project needed to be declared
- I needed to remove all of the graphing related code and dependencies
- I needed to correctly specify all of the commands required to submit the job to google
For the first part, I created a setup.py file per the recommendations of Google quickstart. My setup.py looks like this:
from setuptools import find_packages
from setuptools import setup

REQUIRED_PACKAGES = ['Keras>=2.1.2', 'scikit-learn>=0.19.1', 'urllib3>=1.22', 'h5py>=2.7.1', 'google-cloud-storage>=1.6.0']

setup(
    name='trainer',
    version='0.1',
    install_requires=REQUIRED_PACKAGES,
    packages=find_packages(),
    include_package_data=True,
    description='My trainer application package.'
)
For the second point above, I just removed all of the calls and imports to matplotlib, etc.
For the last part, I finally created a bash script to execute the command for me. That script looks like this:
#!/bin/bash
if [$1 eq ""]
then
    echo Please include a job name!
else
    rm -rf *.pyc
    rm -rf ./train/*.pyc
    gcloud ml-engine jobs submit training $1 --module-name trainer.google_model_trainer --package-path=trainer --job-dir=gs://kaggle_voice_data
    echo Training started.
fi
Getting to that point took me about 10 trial and error attempts. Finally, however, I got it to work!

Conclusion
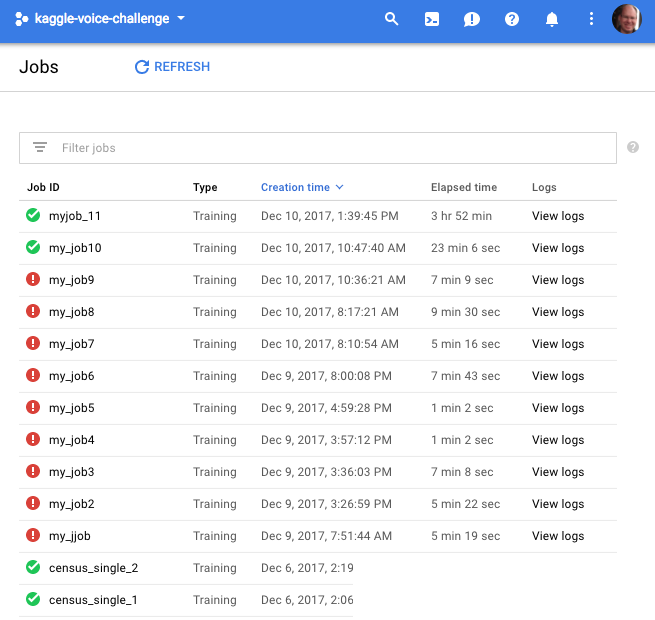
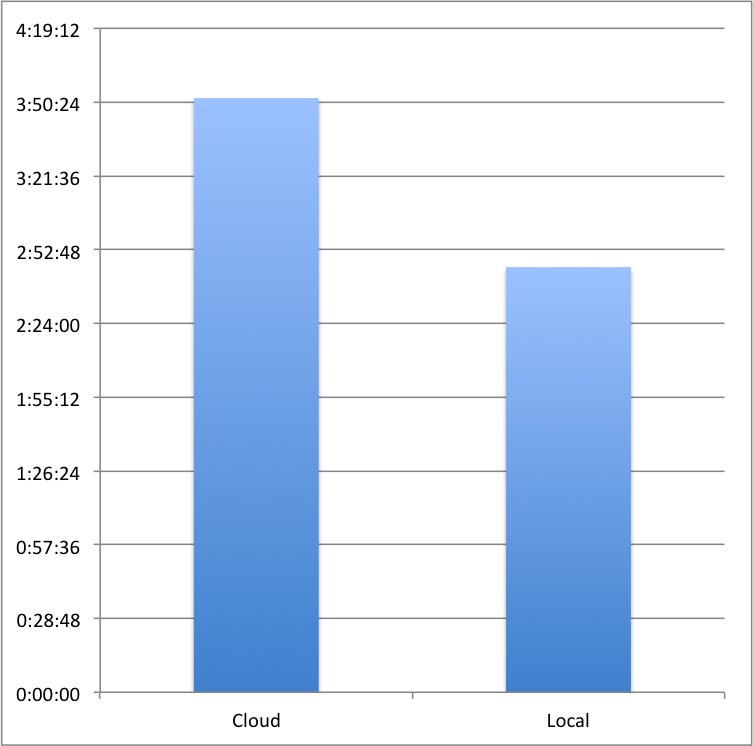
As you can see from the last screen grab above, I trained the network in the cloud twice. The first time I used 1000 test images in batch sizes of 32, and over 5 epochs. That took 00:23:06 in the cloud. The next run I trained again on 1000 images, and batches of 32, but I let the program run for 50 epochs. As expected, it took about 10 times as long. 03:52:??.
To compare this performance to my Mac, I ran the same configuration I used in the second cloud run. This time, however, I ran the trainer on my Mac. By comparison, when I ran the same code locally, it took 02:46:00 approximately. So, the cloud is significantly slower:

The bad news is that, at least considering the way that my job was configured, it trained considerably slower on the Google cloud than it did on my local machine.
The good news is that by running my build on google, I was free to use my Mac for other things! Also, I should be able to run multiple training runs in parallel in the cloud. That will really make a big difference in total training times.
The final accuracy of the model was somewhat disappointing… around 25 percent when I submitted it to Kaggle for evaluation. However, that is not too surprising due to the fact that I only used 1000 training patterns for each category of word. I will be running the training again on the complete training set and with 100 epochs to see if I can increase my accuracy.
I will post an update to this blog when I have complete that setup.
I have discovered a few things that I hope will increase the accuracy. I will post those results as I learn more.
I hope you have enjoyed this post on using Google Cloud Machine Learning for training convolutional neural networks that run on Tensorflow and use the Keras framework. Stay tuned for more blog posts on topics in machine learning and data science!
In the meantime… If you happen to have lasted through this entire post, thank you. I am currently looking for my next gig in data science, machine learning, or general application architecture and software development. (FTE, Contract or Contract to Hire). Please reach out to me at the email address below if you know of any positions or are interested in chatting with me!
Thanks!